
Words and photos by John Herrick, assistance by Joe Dvorsky
When Larry and I started talking about modifying Project Recycle, the TJ we built in 2010, and extending the wheelbase, adding a fuel cell and comp cutting the tub, we realized what I really needed was an LJ, the Wrangler Unlimited, that Jeep built from 2004-2006. Stretching a TJ often leaves you with less space and simply a longer wheelbase. I wanted to be able to use it for more than crawling rocks. Being able to carry a cooler and camp gear, the things that make a weekend fun; the LJ made a lot sense. Now to find one that wouldn’t land me in the brig with the wife. Fast forward to earlier this year and a project Larry was working on at Vegas 4×4 was stalled as the owner shifted funds elsewhere, keeping him out of wife trouble. His 2004 Jeep Wrangler Unlimited race car project was available and at a price that would make this project so sensible I would be crazy to pass on it.
The rig had been stripped of much of its interior; the exterior was a hood, grille, windshield frame and tub. The motor and trans were sitting in a bent frame and that was that. I handed over $2200 and called it mine.
Jeep built the LJ, essentially a lengthened TJ, from 2004.5 to 2006. About one of every five Wranglers was an Unlimited with a three year production run of nearly 56,000 units. The frame was lengthened to add 10 inches of wheelbase and the body was about 16 inches longer. It doesn’t sound like much but it makes a significant difference in cargo capacity as well as increasing confidence while crawling rocks. In my opinion it is just about the perfect Jeep.
The first order of business was replacing the frame since the rig had been hit in the front right corner and was damaged beyond the scope of our ability to fix it. Recognizing when to “replace versus repair”, I found a replacement at LKQ in Salem, Oregon. Shipped to Vegas 4×4 while we were at KOH, the frame set me back $1100. It measured out perfectly and with a coat of paint was ready to be the new foundation of the build.
The motor, the venerable 4.0 inline six, had only 59,000 miles on it and was worth keeping until the inevitable V8 swap. The 42RLE transmission was in the same boat, low miles, ready to roll. Both have turned out to work perfectly once a computer problem was resolved and the engine was firing on all six cylinders again.
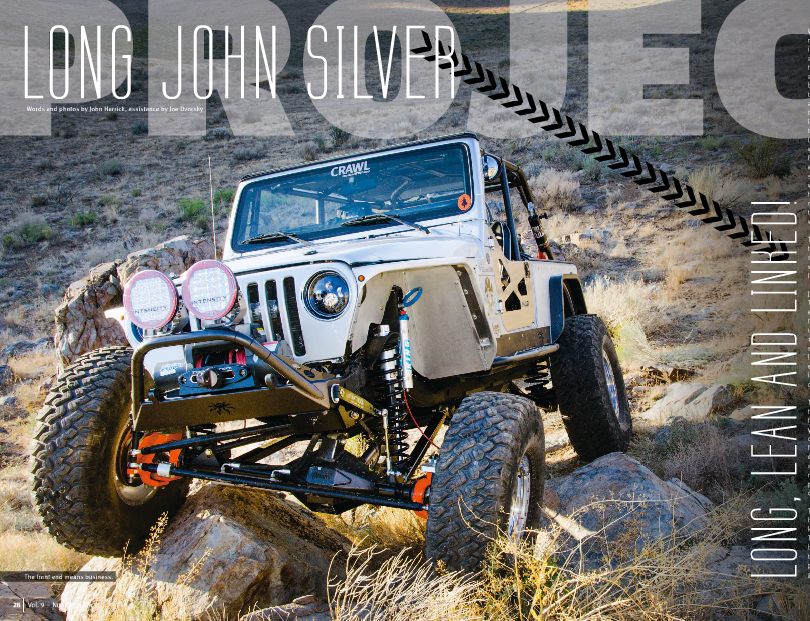
At the end of the powertrain was an Atlas transfer case with a 3.8:1 ratio. I talked to Steve Roberts at Advance Adapters and we went through a few different tire size/ engine horsepower scenarios before we settled on the 3.8. It will give me the most opportunity to have a great ratio for crawling even if I swap in an LS motor down the road. I think an extra two liters of displacement would look real good under this hood. LQ9 maybe? The Atlas can handle it. The suspension we chose was not a hard decision. I’ve wanted to do a Clayton Off road package since we raced on his 3-link front, triangulated 4-link rear at KOH 2013. Larry’s LJ was stable, comfortable, confident and tough. Larry has been on a version of Clayton’s setup for ten years in his LJ and I knew that the funky square tube was the way to go. The skid plate system Clayton has developed is also one of the cleanest and best fitting I’ve seen. It’s tough for what we do but recognizes that the owner can’t take apart the entire suspension to change the oil. It’s modular and well thought out, and substantial enough to take serious abuse.
I also have a soft spot for Currie F9 housings. We built a virtually identical front axle to the one in the Recycle TJ. From the outside in, we used Reid Racing D60 knuckles and Cs, Artec arms, Parts Mike brakes, Yukon hubs, a Yukon 3rd member with the Daytona pinion support and Yukon 5.43:1 gears. A change of pace was the use of a Yukon Grizzly autolocker. They are simple, stout and generally worry free. We raced on Grizzly lockers with the Spec class 4702 car this year at KOH and I was impressed in a race scenario. I’d had them in the CRAWLmaro, too. They simply work.
Vegas 4×4 handled all of the steering and Larry has become a master at making this system work with no bump steer and the ability to go down the road at 75 mph with one hand on the wheel. Using a PSC pump, gearbox, reservoir and 8″ ram, the hydraulic assist piece is always a bit of a jigsaw puzzle to fit. Larry’s ability to visualize how things will act when stuffed on either side or drooped out still amazes me. Using the Reid knuckles and the Artec steering arms lets him be creative with draglink and tie rod positioning. When it’s all done, it’s a dream to drive.
Out back was another Currie F9, this time a full float axle, with 35-spline shafts. A Yukon 3rd, gears and Grizzly make up the center section while Currie does the rest with their own hubs. They use brand new Mopar JK brakes in the rear which, when added to the Parts Mike stuff out front, makes for a great set of brakes. Adding this kind of strength to a rig like the LJ ensures I should haven’t any troubles and is a great foundation for adding power later. I’m also a big fan of the radius design of the center section itself and how well it glides over rocks. You’ll see a few scratches in the paint already, this rig was thoroughly tested before the photo shoot.
Drive shafts are 1350 units from Jim at JE Reel. He’s been doing this for so long he can practically tell you what you need over the phone and then knock it out. I love getting a package from him because I know it’s going to fit and it’s usually the last thing we need before we go wheeling. He also makes sure you aren’t going to do something stupid by reminding you of any potential pitfalls in your plans. Bottom line, if it’s driveshaft related he’s seen or heard about it. It’s comforting to know that his knowledge is on your side. Keeping the business end of the drive shafts in one piece is a pair of Trail-Gear pinion guards that keep rocks out of the yokes.
Keeping the motion under control is a set of King Racing Shocks 2″ diameter by 12″ travel remote reservoir “smoothies”. King builds a great shock. With compression control at the reservoir, the larger than typical shaft, the high build quality and the understanding of how this Jeep was being set up and used, well… you’ve got a great set of shocks. At the lowest setting the rig rolls over speed bumps so smoothly that “mall crawling” brings on a whole new meaning. Dial in a little compression and hit the desert for some speed, it all works.
We added 3.5″ of front shock tower in the front to give us 6″ of both up and down travel. Vegas 4×4 also added a set of Barnes 4WD inboard coil over mounts in the rear to mount the shocks. This gives us more room, prevents interference and allows the same 6″ of up/down travel. There was enough room in the front to mount the reservoirs directly to the bodies; in the rear Larry and Brett fabbed some reservoir mounts. Easy access to the clickers and the Schraeder valves were the goal. We ran this all with a 1″ body lift and used the Swag Off road “Bertha” body mounts to get the side mounts up and out of the way. If they get hit by a rock it won’t destroy them as the factory mounts tend to fail.
I also knew that playing around in the desert means bump stops. I liked the no-hassle no maintenance aspect of the Teraflex Speed Bumps on the Project Recycle and decided to do that again with the LJ. They mount inside the coil springs, stay out of the way, are adjustable for height and require little attention once they’re installed. Available for TJ/LJ as well as JK platforms, these are a great alternative to traditional hydraulic bumps if you don’t need or want to do the maintenance.
Putting all of that power to the ground means tires and wheels. I’ve been a fan of the Trail Gear Creeper Lock beadlock wheel for a while. I’ve run these wheels on three rigs, raced on them as well. They’re tough, they balance perfectly and they don’t leak. Add to that the segmented beadlock ring and that you can add some flair to them, it’s a great package. Considering how many wheels we had trouble with at KOH this year, throwing some Creeper Locks on those rigs might have been a good idea. Larry and I beat the living crap out of them in 2013 on the LJ and he’s still driving around on them.
Wrapped around all that beadlock goodness are Falken Wild Peak MT01 mud terrains. These are 38″ x 13.50″ on a 17″ wheel. They are the off-highway compound and have been a great tire so far. We raced these on the CRAWLmerica on Friday’s KOH race. We also had them on the Spec class car and the CRAWLmerica for the EMC race in a 37″ DOT version. I can’t say enough good things about the Falken tire and their race support. Now that I’m just wheeling them, I’m still impressed. I rolled into the Loon Lake entrance of the Rubicon Trail in July and needed to get to Rubicon Springs quickly. I locked the hubs and didn’t even bother to air down from 24 pounds. I made the first five miles of the trail in just an hour. The tires grip like glue, crawl well without extra heat needed and are quiet on the road. What more do you need?
When it came to deciding on armor, I made the call I’ve wanted to make for a while. Larry McRae at Poison Spyder has mentioned a few times that he would love to see some of his cool stuff on one of our builds. This time I called him first. He picked up and said yes.
The catalyst for this build was the Daddy Longlegs that Larry and his crew built (featured on the cover of CRAWL Issue 40.) I was in love. It’s a simple rig that does everything a trail rig should. It looks cool and has a hot rod vibe to it when you see it parked in Moab or at KOH. It seems people are drawn to it without fully knowing why. I wanted to take this LJ and make something simple and stout, yet unique enough that it would make you stop and take a look. I know now that we did that.
Since this LJ was already silver, we discussed doing a simple surface prep, running a dual action sander over the raw aluminum armor. We chose the standard wheelbase aluminum Crusher Corners but added the steel rear DeFender flares. I’ve never hidden the fact that I’ll drag a rig sideways through anything. Having steel in the rear was simply self preservation. In the front are the high line DeFender XC fenders in aluminum. These require a 3″ cut to the hood and raise the whole assembly about three inches as well. It looks cool, it works giving the tire more room and the fenders themselves are tough as nails. Unlike competitor products which use sheet metal with tube welded to it to create the edge, Poison Spyder creates an entire piece of thick aluminum that can take serious abuse without being crushed. Added to the front were aluminum inner fenders that keep crud out of the engine bay and we were set.
The inner fenders require moving the battery and we used a Trail-Gear battery box to hold our Odyssey PC1500 in place. Poison Spyder provides a new mount for the battery and it lifts it up to clearance the inner fenders. The Trail-Gear unit makes sure the battery doesn’t ever move.
With the longer wheelbase came the need for rockers that would take some abuse too. I also knew that the lift was about 1.5″ higher than the last rig with a tire that added another 1/2″ of height. When we discussed rocker protection I knew that having some form of step was going to be critical. I already felt like a Chinese acrobat getting in and out of the last rig, this one would be even taller. The Poison Spyder Ricochet Rocker has a built-in 5″ step but doesn’t add so much stuff that it’s no longer effective. These are a great melding of the need for a simple standoff and a step. In addition, they fit together with the rear Crusher Corners to create a tight seam where they meet. There’s no layering required, they were designed to work together.
I opted for the Poison Spyder BFH (Built For the Hammers) bumpers both front and rear and they are the definition of simple and stout. Another cool piece that I thought would be a change for the better is their Trail Gate. It’s a simple aluminum replacement tail gate that drops down instead of swinging out like the stock unit. Since I don’t run a full top nor do I plan to ever run a hard top, this was an easy choice for me. I like the versatility of having a place to work, eat, cook or just have an easier time getting the spare tire out. The unit will support a lot of weight and it doesn’t rattle, is lockable and could be left down in a pinch if hauling something home from the hardware store. Under the rear bumper is the Savvy Offroad gas tank skid. I think this is simply the best skid on the market. Light, simple, easy to install and remove if need be – it’s the place where money is well spent.
The front bumper is also home to the Ramsey Patriot 9500UT winch. Derek at Trent Fab first turned me on to these when he explained how the semi-auto clutch in the winch meant the co-dog could set up the recovery but didn’t have to walk back to switch the gear lever. Just applying inbound power locked the winch in gear and got things under way. I like the winch, I like that they have a synthetic rope option and I like that these are built in Tulsa, Oklahoma, USA.
Sharing space with the winch is a pair of ARB Intensity LED lights. Running a flood on the right and a spot on the left, these convert darkness to daylight. With a warning on the front not to look right at them, people ask me to turn them on thinking “how bright can an aftermarket light be?” They quickly learn. I’m really impressed with these and they have led the way several times in the night, making the speeds we were driving far more comfortable since we were within a larger envelope of safety.
While on the road, the JW Speaker LED headlights cover the pavement with usable light that is DOT compliant from a leader in LED technology. Building lighting for lawnmowers to locomotives, these guys know how to illuminate the night. I’m running their Evolution 8700 headlights and they have crisp light breaks, good ditch coverage and are far superior to the typical Jeep sealed beam.
Since the rig didn’t have a cage when I bought it, and I knew time was of the essence at Vegas 4×4, I opted to have Poison Spyder weld up their Lazer Fit cage and ship it ready for install. The day came and three of us picked it up and lifted it into place. I was amazed that the bolt holes at the B-pillar and C-pillar were perfectly lined up. Jeeps being as “loose” as they are, fitment of anything usually requires some cuss words, a few hammer whacks and some finesse. In this case, we had no cage, then, literally ten minutes later, we did. It was that quick. We welded in the harness bar once we got the seat placement and belts figured out.
I figure I spend enough time sitting in my rigs I’m not going to be uncomfortable. I’ve had PRP seats in five rigs now and have settled on the Competition Highback being my personal favorite. Some like the easy in & out that a Daily Driver or an Enduro provide but I like to be tucked in and know that if things go sideways, I’m wrapped up in my PRP. Add to the seats a pair of their 5.3 five-point harnesses and I’m ready to go. This has been a topic of debate for a while, but I wheel with all five-points plugged in. I like the protection that having a full harness provides and have set up the interior of the Jeep to work around that seating position. Once I’m harnessed in, I can reach the t-case shifter, trans shifter, VHF, GPS, belt cutter, fire extinguisher, everything is there at hand. You’re always as safe as you can be whether you’re crawling a rock or hauling ass across the desert.
Larry at Vegas 4×4 called me one day this spring and asked if I wanted full doors for the rig. Since it was bound to snow at some point in Reno, I said yes. He had found the original pair of doors being offered by the guy that had bought them. Now I have the factory doors hanging in the garage waiting for winter.
Until then, I’m running the Moab 4×4 Outpost aluminum trail doors. These are light, easy to put together and even easier to use. The holes let in the right amount of air but mud and dirt tends to avoid you while you’re in the seat. The other thing I really like is that you can see the front tire through the front opening and it helps with placement. While it’s not a big deal in Nevada, some states are particular about running doors while on the road. These do a great job of meeting that requirement and if you want to take them off, it’s just a few seconds and they can be strapped in back, on top, or left at the trailer.
There are a few other things I like that were going to be a part of a build, no matter what. These are in no particular order but deserve mention. I really like these products and heartily recommend them:
Brown Dog motor mounts. These are tough. They fit right, and keep you from having your trip ruined by the wholly inadequate factory motor mounts.
SpiderWebShade is the choice for Jeep sunscreen panels. I know Harvey will groan a little when all the custom orders come in but they do custom stuff and the panel they built for the Poison Spyder Lazer Fit cage is no exception. It fits perfectly, keeps the sun off my rather barren head, cuts wind noise, keeps a tiny bit of rain off and generally makes life more comfortable. I can’t say enough good things about them, mainly because I’ve watched them with their customers and they treat everyone like they are the only one.
When it comes to locking your axle bearings down and keeping them from loosening, Stage 8 Fasteners are the guys that make the X-Lock. It simply makes worrying about bearings coming loose a thing of the past. Affordable, easy to install and available for a variety of axles, these are a great product.
Under the hood rests an ARB CKMTA12 twin compressor. I wanted as much room as possible in the back and I decided to try running a compressor instead of a co2 tank. Taking up 10 x 9 x 4 inches, the compressor is big for a compressor, but small in comparison to my former tank. I chose to run it without any storage tank since it has a 100% duty cycle at over 6 cubic feet per minute which is more than enough to fill tires and run tools. I’ve had a few opportunities to use it and people are not only impressed with how quickly it has filled 37″ tires, but how quietly it does it.
I’ve had the Jeep LJ home now for several weeks. We worked through a bug in the computer until it became obvious I needed a new one. Once that was resolved, this has been nothing but a honeymoon relationship. The Jeep drives down the road with two fingers on the wheel. Once off the road and onto the desert floor, it tracks and drives nicely, the added wheelbase allowing a higher speed than my TJ. My friend Brian and I ran it in the inaugural RallyVenture, a 260+ mile on- and off-road adventure throughout Northern Nevada. The next week it was running through the Rubicon on the Jeepers Jamboree. It’s had a trial by fire and has been broken in. Now the Project Long John Silver is going to enjoy wheeling throughout the country for quite some time to come. Watch for it and when you see it, say “Aarrgh!”

